Pharmacy Details - Electronic Messaging
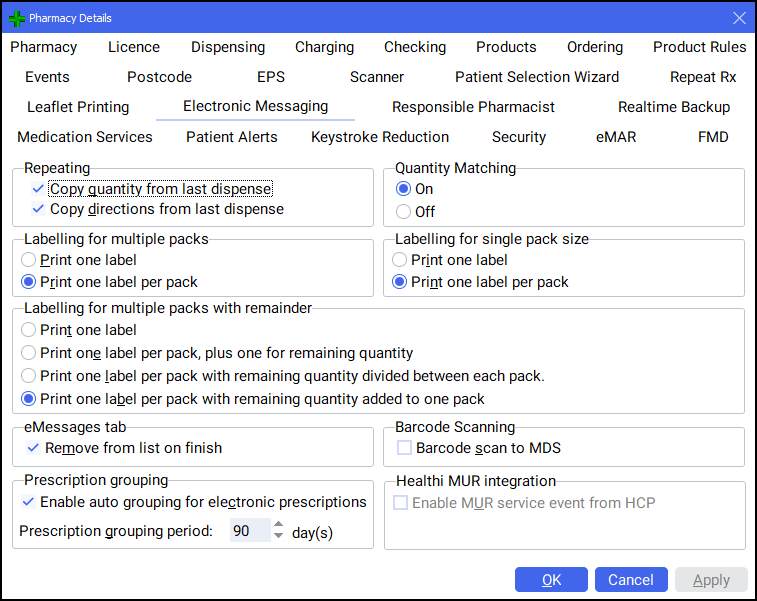
Repeating
This setting lets you manage how you dispense repeat medications:
Complete as follows:
- Copy quantity from last dispense - Select to copy the quantity from the last dispense when dispensing repeat medication.
- Copy directions from last dispense - Select to copy the directions from the last dispense when dispensing repeat medication.
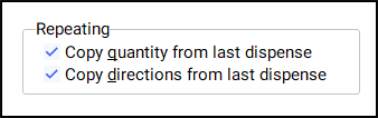
Quantity Matching
Quantity matching uses the dm+d codes on an incoming electronic prescription to automatically enter the quantity to be dispensed:
Complete as follows:
- Select On to enable quantity matching.
- Select Off to disable quantity matching.
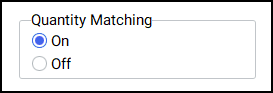
Labelling for multiple packs
Select from:
-
Print one label - Select to print one label after dispensing, regardless of the quantity prescribed and pack size/ number of packs.
Note - After selecting Print one label, Labelling for single pack size and Labelling for multiple packs with remainder are disabled. - Print one label per pack - Select to print one label one label per pack, regardless of the quantity prescribed and pack size/number of packs.
Labelling for single pack size
When Print one label per pack is selected, if the quantity prescribed is dispensed using whole packs, you may choose a default way of dispensing:

The available options are outlined below:
- Print one label - Select to print one label for the whole dispensed quantity.
- Print one label per pack - Select to print a label for each pack when there is no remainder.
Labelling for multiple packs with remainder
When Print one label per pack is selected, if the quantity prescribed cannot be dispensed using whole packs, you may choose a default way of dispensing the left over amount:

The available options are outlined below:
- Print one label - Select to print one label for the whole dispensed quantity. For example an item packed in 28s with a dispensed quantity of 90 would now only print one label.
- Print one label per pack, plus one for remaining quantity - Select to print one extra label for the remainder. For example an item packed in 28s with a dispensed quantity of 90 would print three labels of 28 each, plus one of 6.
- Print one label per pack with remaining quantity divided between each pack - Select to print a series of equal labels where possible. For example an item packed in 28s with a dispensed quantity of 90 would print three labels of 30 each.
- Print one label per pack with remaining quantity added to one pack - Select to produces evenly calculated quantities but append all the remainder to one pack. For example an item packed in 28s with a dispensed quantity of 90 would print two labels of 28 and one label of 34, for example, 28 plus the remainder.
The resulting quantity will be used to populate the quantity field on Dispensary supply tab.
eMessages tab

If chosen, this option will clear entries from the eMessages tab that have been completely processed. It is designed to clear the list of entries that require no further action.
-
Check
 Remove from list on finish to clear
items from the eMessages tab once they have been completed. Alternatively,
type
Remove from list on finish to clear
items from the eMessages tab once they have been completed. Alternatively,
type  &
&
 .
.
Barcode scanning
This option will allow you to initiate the dispensing process for an electronic prescription when its barcode is scanned:

-
Check
Barcode scan to MDS
Prescription Grouping
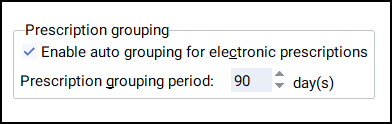
For convenient and efficient dispensing, you can make multiple prescription selections on the eMessages tab.
This is useful and simple functionality when two or more prescriptions appear together. However, when the eMessages for the same patient have arrived at different times, you may overlook making a multiple selection.
In order to avoid patient inconvenience if they do not receive all their medication, Pharmacy Manager can alert you when there are two or more prescriptions for the same patient.
-
To enable this search, check
Enable
auto grouping for electronic prescriptions
The system will automatically set a 90 day look back period. Only prescriptions that match the criteria that have been downloaded within this period will be detected.
-
Use the
 to adjust
the look back period to your preferred period, specified as a number
of days.
to adjust
the look back period to your preferred period, specified as a number
of days.