Viewing New Prescriptions (Wales)
The Prescriptions - New screen displays all new prescriptions that are ready to dispense and require action. You can easily search, sort and filter the prescriptions to manage your workload effectively, see Searching for, Sorting and Filtering New Prescriptions (Wales) for details.
 .
.Prescriptions Table

The Prescriptions table displays a list of patients with the following columns:
-
Select All - Use to select all prescriptions on the page.
-
Patient Name - Displays the patient's name on the prescription. Additional information displays below the patient's name:
-
Matched Status - If the prescription is matched to an existing patient record, the status displays either Matched or Partial Match. If there is no match the status displays Not Matched.
-
-
Type - Displays the type of prescription, whether it is Acute or Repeat Dispensing. Additional information displays underneath:
- Repeat Dispensing Iteration - Displays the prescription iteration, for example, 1 of 6.
-
Controlled Drug Schedule - Displays the controlled drug schedule, for example, CD 4.
-
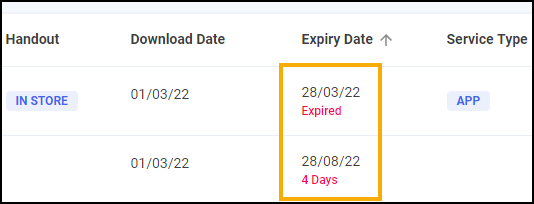
Handout - Displays either IN STORE, DELIVERY or ROBOT, according to the handout method selected on the patient's record (if any).
-
Download Date - Displays the date and time the prescription downloaded.
-
Expiry Date - Displays the prescription expiry date and time:
-
Prescriptions that are due to expire in the next 7-21 days display the number of days in amber.

-
Prescriptions that are due to expire in the next 7 days or have already expired display in red.
-
-
Service Type - Displays any relevant services that the patient uses, for example, APP or MDS.
-
Clinical Check - Displays the clinical check status, either Requires Check or Checked.
Individual Prescriptions
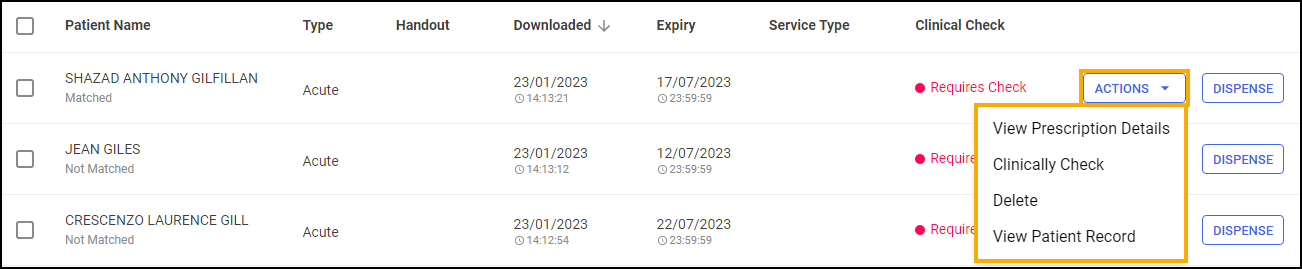
For each individual prescription you have the following options:
- ACTIONS:
View Prescription Details - Select to view the prescription, this opens the eMessage Details screen, see eMessage Details Screen for details. From here you can match the patient if required, see Matching Patients (Wales) for details.
- Clinically Check - Select to clinically check the prescription, this opens the Clinical Check screen, see Clinical Check - Manual (Wales) for details.
- Reset Clinical Check - Clinically checked prescriptions only, select to reset the prescription, this reverts the status from Checked to Requires Check. See Resetting a Clinically Checked Prescription (Wales) for details.
Return to Spine - Select to return the prescription to the NHS Spine.
View Patient Record - Matched patients only, select to open the Patient Details screen.
- DISPENSE - Dispense the individual prescription, see Dispensing New EPS Prescriptions (Wales) for details.
Prescriptions Options
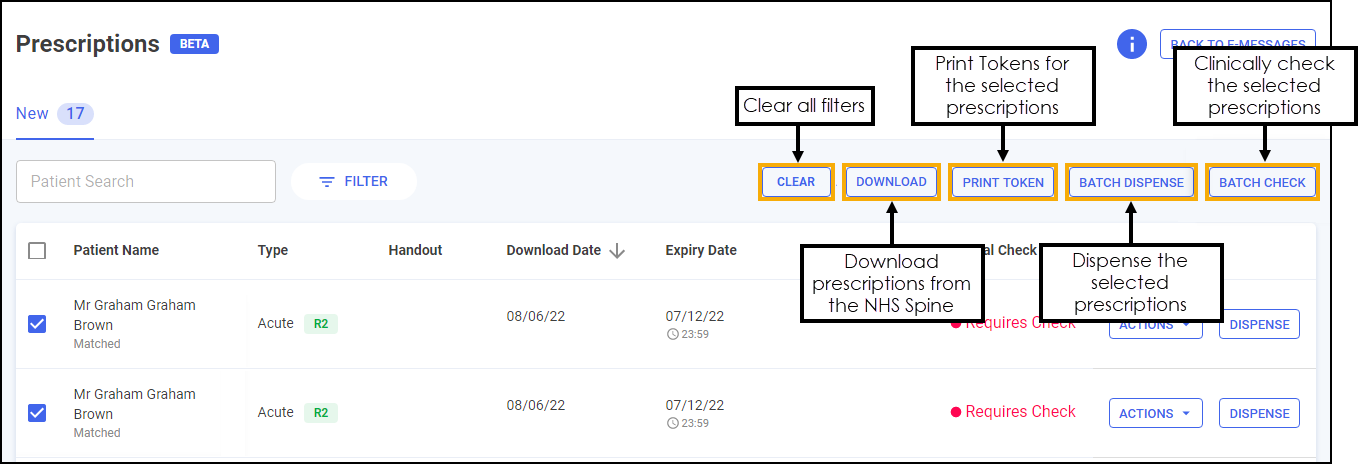
The following options are available from the top of the prescriptions table:
-
DOWNLOAD - Select to download nominated prescriptions, see Downloading Prescriptions (Wales) for details.
-
PRINT TOKEN - Select to print the dispensing token, see Printing Dispensing Tokens (Wales) for details.
Note - This option is only available when a prescription is selected. -
BATCH DISPENSE - Select to dispense as a prescription grouping, see Dispensing New EPS Prescriptions (Wales) for details.
Note - This option is only available when a prescription is selected. -
BATCH CHECK - Select to clinically check multiple prescriptions for the same patient, see Clinical Check - Manual (Wales) for details.
Training Tip - This is only enabled when one or more prescription(s) are selected for the same patient.